Implementing REST service architecture
In the previous article we got a sense of the REST architecture. In this article we will go through the steps of implementing the architecture. Our REST service will provide cryptocurrency predictions. The predictions are persisted in a NoSQL MongoDb database.
The first step is to create the model class representing a single prediction. Each prediction is going to have an id, property which specifies for which cryptocurrency is the rest of the data in the object, real value for the closing price of the cryptocurrency, predicted value for the closing price of the cryptocurrency and date. The POJO looks like this.
					public class Prediction {

    private String id;
    private CryptoCurrency cryptoCurrency;
    private double realValue;
    private double predictedValue;
    private LocalDateTime date;

}
The next step is to add annotations to the POJO so that it can be persisted in the database.The @Document annotation marks the class as a domain object that we want to persist in the MongoDb. The @Id annotation specifies which field to be used as a unique identifier. The Lombok’s @Data annotation is responsible for generating all the boilerplate code that is normally associated with simple POJOs. It is a shortcut annotation for the @Getter, @Setter, @ToString, @EqualsAndHashcode and @RequiredArgsConstructor annotations. Now our POJO is ready to be persisted in the document-oriented database.
					@Data
@Document
public class Prediction {

    @Id
    private String id;
    private CryptoCurrency cryptoCurrency;
    private double realValue;
    private double predictedValue;
    private LocalDateTime date;

}
1. Implementing the Repository layer
The next thing we need to do is to implement the Repository layer. To do so, we create an interface and name it PredictionRepository. Then we annotate the interface with the @Repository annotation and this way we point out an intent. The interface extends the MongoRepository interface and we specify that the Repository is responsible for applying CRUD operations on the Prediction collection and that each document in the Prediction collection has a unique identifier of type String. (Notice that when we insert documents in the database, the String id is automatically converted to id of type ObjectId). Then we specify method definitions for all the operations that we need to perform on the Prediction collection. By the given method names and their parameters, Spring tries to create a class which implements this interface and generates all the code needed for implementing the method declarations. For example the method findByCryptoCurrencyAndDateBetween finds all predictions for the passed as a parameter cryptocurrency which date is between the passed start date and end date.
					@Repository
public interface PredictionRepository extends MongoRepository<Prediction, String> {

    List<Prediction> findByCryptoCurrency(CryptoCurrency cryptoCurrency);
    List<Prediction> findByCryptoCurrencyAndDate(CryptoCurrency cryptoCurrency, LocalDateTime today);
    List<Prediction> findByCryptoCurrencyAndDateGreaterThanEqual(CryptoCurrency cryptoCurrency, LocalDateTime startDate);
    List<Prediction> findByCryptoCurrencyAndDateLessThanEqual(CryptoCurrency cryptoCurrency, LocalDateTime endDate);
    List<Prediction> findByCryptoCurrencyAndDateBetween
            (CryptoCurrency cryptoCurrency, LocalDateTime startDate, LocalDateTime endDate);

}
2. Implementing the Service layer
The next step is to implement the Service layer. First we create an interface called PredictionService. We add the @Service annotation to the interface, specifying the intent of the interface better. Then we add all method declarations that will be implemented in the Service layer. It is a good idea to use interface and then provide different implementations of it. This way, if the business rules change in the future, we can just inject different implementation of the interface in the associated controller. In the example we specify only one method – getPrediction. It returns all predictions for the given cryptocurrency which date is in the specified time interval.
					@Service
public interface PredictionService {

    List<Prediction> getPrediction(CryptoCurrency cryptoCurrency, String startTime, String endTime);

}
Then we create an implementation of the interface. We call the class PredictionServiceImpl and annotate it with the @Service annotation, specifying an intent.
					@Service
public class PredictionServiceImpl implements PredictionService {
The next thing is to create a constructor for injecting an instance of the PredictionRepository.
					private PredictionRepository predictionRepository;

public PredictionServiceImpl(PredictionRepository predictionRepository) {
    this.predictionRepository = predictionRepository;
}
The last thing we need to do in the PredictionServiceImpl class it to implement the method getPrediction from the PredictionService interface. The implementation looks complicated and we won’t go in depth with it. The idea is that based on the values of the startTime and endTime parameters (whether null or not) an appropriate method from the PredictionRepository is called for performing a select operation on the Prediction collection. The result from the query is returned as a List of Prediction objects.
					@Override
public List<Prediction> getPrediction(CryptoCurrency cryptoCurrency, String startTime, String endTime) {
    DateTimeFormatter formatter = DateTimeFormatter.ofPattern("yyyy-MM-dd'T'HH:mm:ss");
    LocalDateTime startDateTime;
    LocalDateTime endDateTime;
    if (Objects.nonNull(startTime) && Objects.nonNull(endTime)) {
        startDateTime = LocalDateTime.parse(startTime, formatter);
        endDateTime = LocalDateTime.parse(endTime, formatter);
        //can't construct between with equals to (this is why plus and minus day is used)
        return predictionRepository.findByCryptoCurrencyAndDateBetween(cryptoCurrency, startDateTime.minusDays(1), endDateTime.plusDays(1));
    } else if (Objects.nonNull(startTime)) {
        startDateTime = LocalDateTime.parse(startTime, formatter);
        return predictionRepository.findByCryptoCurrencyAndDateGreaterThanEqual(cryptoCurrency, startDateTime);
    } else if (Objects.nonNull(endTime)) {
        endDateTime = LocalDateTime.parse(endTime, formatter);
        return predictionRepository.findByCryptoCurrencyAndDateLessThanEqual(cryptoCurrency, endDateTime);
    } else {
        return predictionRepository.findByCryptoCurrency(cryptoCurrency);
    }
}
3. Implementing the Web layer
The final architecture level we need to implement is the web layer. We create a Prediction controller for exposing database data to the REST clients. The class is called PredictionController and we add the @RestController annotation which includes the @Controller and @RequestBody annotations. By doing so, each request handling method of the controller automatically serializes return objects into HttpResponse class. We add the @RequestMapping annotation as a class-level annotation. It maps a specific request path onto the controller (specifies the base URI).
					@RestController
@RequestMapping("/crypto-mind/rest/v1/coins")
public class PredictionController {
Then we add a PredictionService property to our controller. We add a constructor for injecting an instance of the PredictionService property. If we have many different implementations of the interface, we would need to add the @Qualifier annotation to the constructor to tell Spring which bean to inject (which implementation we want to use). However, we have only one implementation (the PredictionServiceImpl class) and Spring knows what to inject properly.
					private PredictionService predictionService;

public PredictionController(PredictionService predictionService) {
        this.predictionService = predictionService;
}
Then we add a method called getPredictions for handling GET requests. We add the @GetMapping annotation to the method and we specify a path which is concatenated to the class-level path. The @ResponseStatus annotation specifies the response code which is returned from the controller’s method (in this case the response code is 200). The @PathVariable annotation maps the URI’s name variable to the cryptoCurrency parameter’s value. The @RequestParam annotations retrieve the URI parameters and map them to the startTime and endTime method’s parameters. Then the method calls the associated method from the service interface, passing the extracted from the URI values. An additional business logic is applied in the lower architecture levels and a database call is being made. The result from the database call is returned back to the controller’s method. Then the controller method returns a List of predictions and serializes the response in a HttpResponse object.
					@GetMapping("{name}/prediction")
@ResponseStatus(OK)
public List<Prediction> getPredictions(@PathVariable(value = "name") CryptoCurrency cryptoCurrency,
                                       @RequestParam(value = "period_start_time", required = false) String startTime,
                                       @RequestParam(value = "period_end_time", required = false) String endTime {
    return predictionService.getPrediction(cryptoCurrency, startTime, endTime);
}
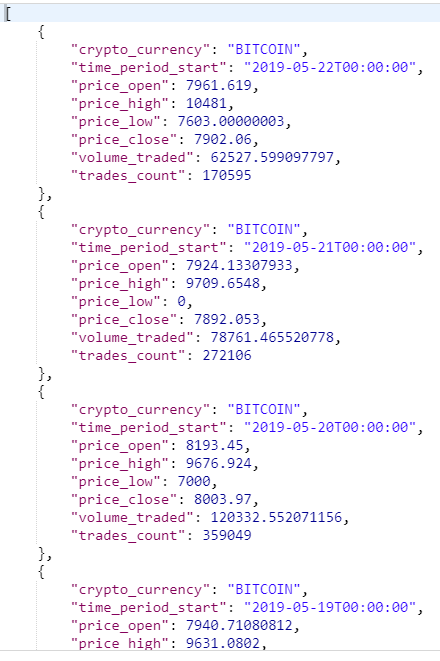
And that’s it. We successfully implemented the REST service architecture. The last thing we can do is to test our controller. Let’s open an API development tool for testing the controller. In the example we will use Postman but you can choose your favorite REST client tool. We request all available predictions for Bitcoin. The result from the request is shown below.
Letzte Beiträge
Share :
Share :
Weitere Beiträge

6 Fragen an unseren Geschäftsführer Dimitar
Heute möchten wir euch Dimitar vorstellen, einen unserer zwei Geschäftsführer bei der DiSC. Er ist Spezialist für Mobile Netzwerke, Java Backend, Java Enterprise Edition sowie für Java Spring Boot

Dependency Injection with Spring 5
As we learned in the previous chapter dependency injection is a very powerful technique. DI is provided by the Spring 5 Framework implementation of the Inversion of Control (IoC) principle.

Designing REST API architecture
The web layer is the top layer in the architecture. It is responsible for processing user queries and returning back responses to the user. These operations happen in the controllers.